Good flight sim panel labeling is the difference between a box you read at a glance and one you mis-flip on every approach. The methods that survive a year of use are engraved acrylic overlays and laser-printed legends sealed under lamination — both beat the peel-prone label-maker tape that most first builds rely on. Layout matters as much as the label: group switches by system the way a real cockpit does.
I’ve labeled boxes every way there is, and watched most of those labels age badly — tape that curled in a warm sim room, ink that smeared the first time an oily finger found it. This guide is what actually lasts, and the layout logic that keeps your hand finding switches without looking. It’s the finishing step that turns a parts-bin box into something that reads like a cockpit; for the full build, start at the DIY button box guide.
Why cheap labels fail
The default first-build label is a handheld label-maker, and it fails for predictable reasons. The adhesive is designed for filing cabinets, not for a panel your fingers brush constantly, so the leading edge lifts within months. Heat accelerates it — a sim room with a hot PC and three monitors runs warm, and warmth is what curls tape. Printed paper labels are worse: the ink isn’t sealed, so the first slightly oily fingertip smears the legend, and any label near a frequently flipped switch wears to illegibility.
The deeper problem is that these labels sit on top of the panel, proud of the surface, exactly where fingers catch them. A label that’s flush with or recessed into the panel survives because nothing snags it. That single principle — flush or recessed beats raised — explains why the durable methods below all work and the tape doesn’t. On my deck the only label-maker labels that survived a full year were the ones I sealed under a layer of clear tape, and at that point you may as well do it properly.

The labeling methods, compared
There are five approaches worth considering, and they trade cost and effort against how long they last and how good they look. As an Amazon Associate I earn from qualifying purchases. The cheapest is a label maker with laminated tape; the best-looking is an engraved acrylic overlay you cut on a laser or order cut to size from a service like Ponoko. In between sits the method I use most: legends printed on a laser printer onto clear adhesive sheets and sealed.
| Method | Cost | Durability | Looks | Best For |
|---|---|---|---|---|
| Label-maker tape | Low | Poor (peels) | Basic | A quick first box |
| Laser-printed + laminated | Low | Good | Clean | Most builders (my go-to) |
| Printed adhesive vinyl | Medium | Good | Sharp | Custom multi-color legends |
| Engraved acrylic overlay | High | Excellent | Cockpit-grade | A showcase panel |
| Embossed Dymo tape | Low | Good | Retro/industrial | A deliberate vintage look |
My honest ranking: laser-printed-and-laminated is the best value by a wide margin — sharp text, full layout control, and durability that easily clears a year for the cost of a sheet of paper and some lamination pouches. Engraved acrylic is the one that makes visitors think you bought the panel, but it needs laser access or a cut-to-order service and costs real money. The embossed Dymo route is a deliberate aesthetic, not a default — it looks great on a retro warbird-themed box and out of place on a glass-cockpit build.
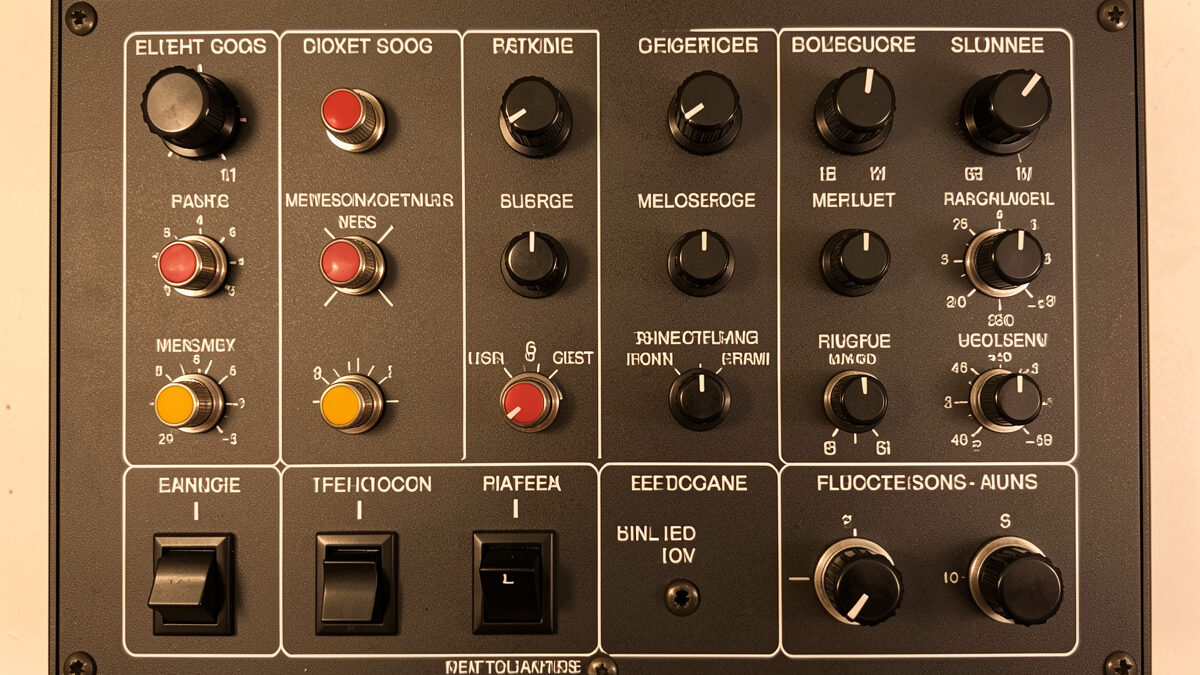
Layout: group by system, not by switch type
A panel labeled with perfect legends but laid out badly is still hard to fly. Real cockpits group controls by system — lighting together, fuel together, electrical together — so your hand learns a region rather than memorizing 25 individual positions. Copy that. Put the lighting toggles in one cluster, the fuel and pump switches in another, the avionics and autopilot in a third. Within a cluster, order switches the way the checklist runs, so your finger sweeps left to right as you work through it.
Keep the controls you reach for under pressure where your hand falls naturally and blind. Gear and flaps should be findable without looking, because on a busy approach you’re looking outside, not at the box. Leave the encoders at the edges where you can spin them with a thumb. This grouping discipline is the same logic that drives the whole upgrade order doctrine — build for how you actually fly, not for how the panel photographs. A well-grouped box becomes muscle memory in a week; a randomly arranged one never does.

My go-to method, step by step
Here’s the laser-printed-and-laminated process I use on most boxes. Lay out the legends in any vector or even a word processor, sized to your switch spacing, with crisp white-on-black or black-on-white text. Print on a laser printer — inkjet ink runs when it meets lamination heat, laser toner doesn’t. Laminate the printed sheet, or cover it with a layer of clear self-adhesive film. Then cut the whole legend as a single overlay panel with holes punched for each switch, so it sits flush around the toggles rather than as individual stickers that can peel one at a time.
Cutting it as one overlay is the trick that makes it last — there are no individual label edges for a finger to catch, and the switch nuts clamp the overlay down around every hole. Use a sharp craft knife and a metal ruler, or a punch for the round holes. The result reads like a real panel and survives because it’s effectively part of the panel, held captive by the hardware. For the matching enclosure work, the Arduino build walkthrough covers drilling the switch holes that this overlay registers to.
Legibility in a dim sim room
Most serious sim flying happens in a dimmed room so the screens pop, and a label you can’t read in low light defeats the purpose. White text on a dark panel reads better in the dark than dark text on light. If you want to go further, some builders backlight the panel — a strip of LEDs behind a translucent overlay so the legends glow like a real cockpit at night. That’s an ambitious add-on, not a first-box requirement, and it draws power and wiring you don’t strictly need.
A simpler win is contrast and font choice: a clean sans-serif at a generous size beats a cramped fancy font every time, and a matte panel finish kills the glare that a glossy surface throws back from your monitors. I learned the dim-room lesson the same way I learned everything on this deck — Swedish winters make me a night-flying regular, and a label I couldn’t read at 2 a.m. got remade the next day. Build the labels for the light you actually fly in.
Labeling that survives a remap
Here’s the thing nobody tells you: your first labels will be wrong, because you don’t yet know which switch you’ll want where. After a month of flying you’ll wish the landing-light toggle were one position over, or you’ll rebind a spare switch to a function you didn’t anticipate. If your labels are individual stickers, remapping means peeling and replacing one at a time and the panel slowly turns into a patchwork. If your labels are a single printed overlay, you reprint the whole sheet for the cost of one page and the panel looks factory-fresh again.
That’s the quiet argument for the overlay method beyond durability — it’s cheap to iterate. I keep the layout file for every box I build, so a remap is a five-minute edit and a reprint rather than a rebuild. Save your source file, label it with the box name, and version it when you change the layout. The first box I didn’t keep a file for, I ended up reverse-engineering the spacing with calipers when I wanted to add two switches. Now every overlay starts from a saved template, and adding a row is trivial. Treat the labels as software you can reprint, not as permanent decals, and the panel stays honest as your bindings evolve.
Frequently Asked Questions
What is the most durable way to label a flight sim button box?
An engraved acrylic overlay lasts longest because the lettering is cut into the material and cannot wear off. For most builders, laser-printed legends sealed under lamination and cut as a single overlay panel are nearly as durable for a fraction of the cost.
Why does my label-maker tape keep peeling?
Label-maker adhesive is made for filing, not for a warm panel your fingers brush constantly. Heat from the PC and monitors curls the leading edge, and raised tape sits exactly where fingers catch it. Flush or recessed labels survive; raised ones do not.
Should I use an inkjet or laser printer for panel labels?
Laser. Toner is fused to the paper and survives the heat of lamination, while inkjet ink runs when it meets that heat and smears when touched. If you only have an inkjet, seal the print under cold self-adhesive film rather than heat lamination.
How should I arrange switches on a button box panel?
Group them by system the way a real cockpit does: lighting together, fuel together, electrical together. Order each cluster the way the checklist runs, and keep gear and flaps where your hand finds them blind. Grouping turns the panel into muscle memory within a week.
Can I backlight a DIY flight sim panel?
Yes, with LED strips behind a translucent overlay so the legends glow at night. It is an ambitious add-on, not a first-box requirement, and it adds power draw and wiring. A simpler win is white text on a dark matte panel, which reads well in a dimmed room.